Site hosted by Angelfire.com: Build your free website today!

The "Rising Sun" military badge
of the Australian troops


Kokoda


Background to the battle


Prelude
Battle of the Coral Sea
Kokoda Track
Japanese land in Papua
Imita Ridge
Gona-Buna-Sanananda
Gona
Buna
Sanananda


Prelude

After rapid successes in the early months of the war, the Japanese Naval General Staff wanted to move into Eastern New Guinea, and down the Solomons and New Hebrides to New Caledonia, Fiji and Samoa. Admiral Yamamoto and the staff of the Combined Fleet considered Japan's first priority was the destruction of the American Pacific Fleet and instead proposed the seizure of Midway as a preliminary step to the invasion on Hawaii. The Naval General Staff's opposition to Yamamoto's Midway operation promptly vanished on 18 April after the Doolittle raid on Tokyo. The Port Moresby thrust had proceeded too far to be called off by the time the order was given for the Midway operation leaving the Japanese with two concurrent strategies which were destined to overextend their forces.


Battle of the Coral Sea

The Port Moresby operation, under the overall command of Vice-Admiral Shigeyoshi Inouye, was to be preceded by the capture of Tulagi in the Solomons. The strike group to protect the expedition was commanded by Vice-Admiral Takagi with the powerful aircraft-carriers Shokaku and Zuikaku, two cruisers and six destroyers and was to sweep through the Coral Sea and bomb the airfields at Townsville, Cooktown and Thursday Island. A Cover Group, under Rear-Admiral Goto, consisted of the light aircraft-carrier Shoho, four heavy cruisers and one destroyer. After it covered the Tulagi landing it was to turn back west to protect the Port Moresby Invasion Group of 11 transports, carrying both army troops and a naval landing force, which, screened by destroyers were to steam round the eastern end of Papua, through the Jomard Passage. Inouye thought he could envelop the allied fleet with Goto on the west flank and Takagi on the east, while the Invasion Group slipped through the Jomard Passage to Port Moresby. With the Allied fleet destroyed he could then proceed with the bombing of bases in Queensland.

The Americans had succeeded in completely breaking the Japanese naval code and possessed accurate and fairly detailed intelligence concerning the Japanese plans. However, the US had only limited forces available to take advantage of this knowledge. Only Rear-Admiral Aubrey W. Fitch's Task Force 11 with the aircraft-carrier Lexington and Rear-Admiral Frank J. Fletcher's Task Force 17 with the aircraft-carrier Yorktown were available. Fletcher was in tactical command of the whole force and ordered to operate in the Coral Sea from 1 May. Task Force 44, under Rear Admiral Crace, RN, with Australian heavy cruisers Australia and Hobart in Sydney and the American heavy cruiser Chicago and destroyer Perkins at Noumea, were ordered to rendezvous with Fletcher in the Coral Sea. Fitch's Lexington force joined Fletcher as planned at 0630 hours on 1 May. Both aircraft-carriers commenced refuelling. Fitch estimated that his refuelling would not be completed until 4 May whereas Fletcher only required 24 hours. Fletcher decided not wait for Fitch to refuel or Crace to arrive and steamed west on the 2nd, leaving orders for Fitch to rejoin him by daylight on the 4th.

On the evening of the 3rd Fletcher learnt of the landing at Tulagi and set off north to attack next morning. When Yorktown's aircraft arrived over Tulagi early on the 4th they found only small vessels and landing craft there. They attacked and sank some of them for the loss of three aircraft. Fletcher rejoined Fitch and Crace about 0816 on 5 May and spent most of the day refuelling from Neosho. Meanwhile, Takagi's Strike Group had moved down along the outer coast of the Solomons and was well into the Coral Sea by dawn on 6 May. The Port Moresby Invasion Group was on a southerly course for the Jomard Passage, while Goto's Cover Group began refuelling south of Bougainville, completing this task by 0830 the next morning. Inouye not knowing where the Fletcher was, used most of his aircraft on the 5th in a bombing attack on Port Moresby. On the 6th, the oilier Neosho, escorted by the destroyer Sims, was detached at 1755, and told to head south for the next fuelling rendezvous. Fletcher was receiving intelligence reports regarding the movements of Japanese ships and it became fairly obvious that the Japanese invasion force would come through the Jomard Passage on the 7th or 8th. He cut short fuelling operations and headed north-west at 1930 on 6 May, to be within strike distance by daylight on the 7th.

At 1030 hours on 6 May B-17s from Australia located and bombed the Shoho south of Bougainville. The bombs fell wide, but aircraft again spotted the Goto's Cover Group around noon and later located the Port Moresby Invasion force near the Jomard Passage. Estimating that Fletcher was about 500 miles to the south-west, and expecting him to attack the next day, Inouye ordered that all operations should continue according to schedule. At midnight the invasion transports were near Misima Island, ready to slip through the Jomard Passage.

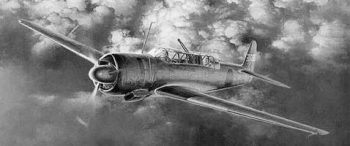
Japanese reconnaissance aircraft


At 0736 on 7 May one of Takagi's reconnaissance aircraft reported sighting an aircraft-carrier and a cruiser. This evaluation was accepted, the distance was closed and an all-out bombing and torpedo attack ordered. In fact, the sighted vessels were the Neosho and the Sims. Both ships were repeatedly attacked by Japanese aircraft, and at about noon, the Sims sank with the loss of 379 lives. The Neosho suffered seven direct hits and drifted until 11 May when 123 men were taken off and the oilier was scuttled.

At 0645, Fletcher ordered Crace's support group to push ahead on a north-westerly course to attack the Port Moresby Invasion Group, while the rest of Task Force 17 turned north. A Japanese seaplane spotted the support group at 0810 and in the afternoon when the ships of Crace's force were south and a little west of Jomard Passage they were successively attacked by land-based single-engined bombers, navy bombers and high-level bombers. A final attack by three bombers flying at 25,000 feet was later discovered to have been American B-26s stationed at Townsville. The support group had beaten off all the attacks and Crace had dispelled the Japanese myth that a naval force could not survive repeated attacks from land-based aircraft.

While Takagi's aircraft were attacking Neosho and Sims, the Shoho of Goto's Cover Group, had turned south-east into the wind to launch four reconnaissance aircraft and to send up other aircraft to protect the Invasion Group 30 miles to the south-west. By 0830 Goto knew exactly where Fletcher was, and ordered Shoho to prepare for an attack. Other aircraft had meanwhile spotted Crace's ships to the west. The result of these reports was to make Inouye anxious for the security of the Invasion Group, and at 0900 he ordered it to turn away instead of entering Jomard Passage, thus keeping it out of harm's way until Fletcher and Crace had been dealt with. In fact, this was the nearest the transports got to their goal.

At 0815 one of Yorktown's reconnaissance aircraft reported two carriers and four heavy cruisers about 225 miles to the north-west, on the other side of the Louisiades. Assuming that this was Takagi's Strike Group, Fletcher launched a total of 93 aircraft between 0926 and 1030. However, no sooner had Yorktown's attack group become airborne than the scout returned and it was immediately discovered that an error in the pilot's coding pad meant the two carriers and four heavy cruisers should have read two heavy cruisers and two destroyers. Fletcher allowed the strike to proceed despite the error in the hope that the invasion force or other profitable targets were in the vicinity. The attack group from Lexington, well ahead of the Yorktown aircraft, was nearing Misima Island in the Louisiades shortly after 1100, when it spotted an aircraft-carrier, two or three cruisers, and some destroyers about 25 miles to the starboard. This was the Shoho with the rest of Goto's Cover Group. As the Shoho was only 35 miles south-east of the original target location, it was a simple matter to redirect the attack groups over the carrier. Under a concentrated attack, the Shoho stood little chance and was soon on fire and dead in the water. The Shoho sank soon after 1135.

After the air groups safely landed, Fletcher set a westerly course during the night of 7/8 May. Both sides expected a decision on the 8th with everything depending on locating the enemy as early as possible in the morning.

One of Lexington's scouts sighted the Japanese carriers at 0815 and reported that Takagi was 175 miles to the north-east of Fletcher's position. At 0930, the Japanese Strike Group was sighted steaming due south in a position 25 miles north-east of the original contact, but about 45 miles north of Takagi's expected position at 0900 as predicted on the strength of the first contact. The discrepancy was to cause trouble for Lexington's attack group, which by this time was airborne. Fitch had begun launching his strike between 0900 and 0925, the Yorktown group of 24 bombers with two fighters, and nine torpedo-bombers with four fighters, departing ten minutes before the Lexington aircraft. The dive-bombers spotted the Japanese first, at 1030, and took cloud cover to await the arrival of the torpedo-bombers. While Shokaku was engaged in launching further combat patrols, Zuikaku disappeared into a rain squall. The attack, which began at 1057, thus fell only on the Shokaku. Although the Yorktown pilots co-ordinated their attack well, only moderate success was achieved. The American torpedoes were either avoided or failed to explode, and only two bomb hits were scored on the Shokaku, one damaging the flight-deck well forward on the starboard bow and setting fire to fuel, while the other destroyed a repair compartment aft. The burning Shokaku could recover but no longer launch aircraft. Only 15 of 37 Lexington aircraft located the target. The torpedoes were again ineffective, but the bombers scored a third hit on the Shokaku. Although 108 of the vessel's crew had been killed, she had not been holed below the water-line, and her fires were soon brought under control. Most of her aircraft were transferred to the Zuikaku before Takagi detached Shokaku at 1300, with orders to proceed to Truk.

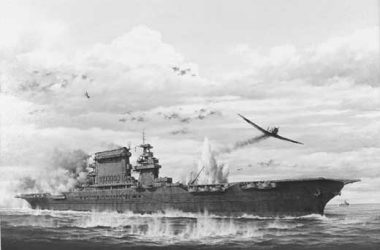
The USS Lexington at the Battle of the Coral Sea


The Yorktown and Lexington came under attack in the interval between the strikes of their respective air groups on the Japanese aircraft-carriers. The Japanese had begun launching at about the same time as the Americans, but their attack group of 18 torpedo-bombers, 33 bombers, and 18 fighters was larger, better balanced, and more accurately directed to the target. Although the American radar picked them up 70 miles away, Fitch had far too few fighters to intercept successfully, and was forced to rely mainly on his AA gunners for protection. At 1118 hours the Japanese aircraft commenced their attack. The Yorktown, with a smaller turning circle than the Lexington, successfully avoided eight torpedoes launched on her port quarter. Five minutes later she came under dive-bomber attack but escaped unscathed until 1127 when she received her only hit, an 800-pound bomb which penetrated to the fourth deck, but did not impair flight operations. During this time, the evasive manoeuvres gradually drew the American aircraft-carriers apart and, although the screening vessels divided fairly evenly between them, the breaking of their defensive circle contributed to Japanese success.

The Lexington had a larger turning circle than the Yorktown and despite valiant manoeuvres received one torpedo hit on the port side at 1120, quickly followed by a second opposite the bridge. At the same time a dive-bombing attack commenced from 17,000 feet, the Lexington receiving two hits from small bombs. A list of 7 degrees caused by the torpedo hits was corrected by shifting oil ballast, while her engines remained unharmed. To her returning pilots she did not appear to be seriously damaged, and the recovery of the air group went ahead. At 1247, a tremendous internal explosion, caused by the ignition of fuel vapours by a motor generator which had been left running, shook the whole ship. A series of further violent explosions seriously disrupted internal communications. Yet another major detonation occurred at 1445, and the fires soon passed beyond control. The destroyer Morris came alongside to help fight the blaze but the need for evacuation became increasingly apparent. At 1630 hours the Lexington had come to a dead stop, and all hands prepared to abandon ship. At 1710 the Minneapolis, Hammann, Morris, and Anderson moved to evacuate the crew. The destroyer Phelps fired five torpedoes at 1956 and the Lexington sank at 2000.

The Battle of the Coral Sea was now over. The Japanese pilots had reported sinking both American aircraft-carriers, and the acceptance of this evaluation influenced Takagi's decision to detach the Shokaku for repairs, as well as Inouye's order that the Strike Group should be withdrawn. Even though he thought that both American aircraft-carriers had been destroyed, the cautious Inouye still deemed it necessary to postpone the invasion, apparently because he felt unable to protect the landing units against Allied land-based aircraft. Yamamoto did not agree with this decision and, at 2400 hours, countermanded the order, detailing Takagi to locate and annihilate the remaining American ships. But, by the time Takagi made his search to the south and east, Fletcher was out of reach.

Although the Japanese lost 43 aircraft on 8 May to the 33 lost by the Americans, the sinking of the Lexington, Neosho, and Sims far outweighed the loss of the Shoho and the various minor craft sunk at Tulagi. The Japanese had achieved a material victory but despite their losses, the Americans were able to repair the Yorktown in time for Midway less than one month later where the war decisively turned against Japan. The Coral Sea was a decisive strategic American victory. The Japanese operation to capture Port Moresby was thwarted and the Australian eastern coast was not attacked and the only serious bombing threat during the 1939-45 War to major towns on the Queensland coast was eliminated. The battle was of great significance in the development of naval warfare since, for the first time, fleets had fought one another without direct visual contact. The aircraft carrier had replaced the battleship as the backbone of the fleet.


Kokoda Track

The "Golden Stairs" climbing to Imita Ridge were cut into the Track after the 39th Battalion first crossed the mountains


In 1942, a seldom used track climbed from the small village of Buna on the north coast of Papua, over the Owen Stanley Ranges and on to Port Moresby. The track was fairly easy up the slopes through Gorari and Oivi to the village of Kokoda which stood on a small plateau 400 metres above sea level, flanked by mountains rising to over 2000 metres. It then climbed over steep ridges and through deep valleys to Deniki, Isurava, Kagi, Ioribaiwa, Ilolo and, at Owens' Corner, linked with a motor road leading from plantations in the hills above Port Moresby down to the coastal plains. Between Kokoda and Ilolo, the track often climbed up gradients so steep that it was heart-breaking labour for burdened men to climb even a few hundred yards. Much of the track was through dense rain forest which enclosed the narrow passage between walls of thick bush. At higher levels the terrain became moss and stunted trees which were often covered in mist. From July to November 1942 this was the setting for a bitter campaign to prevent the fall of Port Moresby.

On 23 January 1942, less than seven weeks after the Pacific War had commenced and while the struggles for Malaya and the Philippines still continued, the Japanese landed at Kavieng on New Ireland and at Rabaul on New Britain where they quickly overcame the Australian defenders. From Rabaul the Japanese had aerial coverage of the whole of the Territories of Papua and New Guinea as well as Northern Australia with Port Moresby suffering its first raid on 3 February. On 8 March, the Japanese established themselves firmly in Australian New Guinea at Lae and Salamaua. However, the Battle of the Coral Sea from 5 to 8 May averted a Japanese seaborne invasion of Port Moresby and the American success at the Battle of Midway in June not only destroyed Japan's capacity for undertaking long range offensives but also provided the Americans with the opportunity to move from the defensive to the offensive. With a seaborne attack unavailable, the Japanese, who were regularly bombing Port Moresby with twenty to thirty bombers with fighter escort, decided on the overland attack across the Owen Stanley Ranges.


Japanese land in Papua

The Japanese landed in the Gona area of Papua on the night of 21/22 July 1942 and had built up a force of 13,500 troops by the end of July. The first contact occurred on 24 July with a forward platoon of the Papuan Infantry Battalion at Awala, 40 kilometres inland. The platoon fell back to Gorari where they linked up the following day with the leading company of the 39th Battalion, a Victorian militia unit. The Japanese pressed on and pushed the small Australian force back through Oivi to Kokoda where the 39th Battalion's commanding officer, Lt Colonel W T Owen was killed on the night of 28/29 July. The Australian defenders were again pushed back and consolidated at Deniki. On 8 August, an attack by three companies of the 39th Battalion reached Kokoda but being unable to hold the position the battalion was again forced to fall back to Deniki. The Japanese pressed the Australians and although attacks on 9 and 10 August were beaten off, the Australian position had become isolated with food and ammunition running low. The Australian position was strongly pressed on 13 and 14 August and the decision was taken to withdraw to Isurava where the 39th Battalion was joined by the 53rd Battalion on 20 August.

Further reinforcements from Australia were already on the way. The veteran 21st Brigade which had seen service in Syria commenced loading in Brisbane on 6 August and as soon as it landed at Port Moresby was rushed into the mountains. The Brigade Commander, Brigadier A.W. Potts, on foot like all his men, reached Isurava on 23 August with two of his battalions strung out along the track behind him. Although he had been assured that adequate supplies had been moved forward, Potts found a completely inadequate reserve of rations and ammunition and although the cold was severe, only 80 blankets. There were not enough native carriers to bring up sufficient supplies and air-supply was limited by the lack of landing grounds and dropping areas, by the problem of developing efficient dropping methods and most of all by the shortage of aircraft. Without adequate supplies, the entire Australian operation in the Owen Stanley was in danger of collapsing. The failure of the supply system undermined Potts' position even before he met the Japanese and caused his command to change from an offensive to defensive role.

On 26 August, the 2/14th Battalion of the 21st Brigade moved up to Isurava to relieve the 39th Battalion whose men were in a weak condition due to a lack of warm clothing, blankets, shelter and rations. Before the relief was carried out, the Japanese renewed their attack which they sustained on the Australian positions on succeeding days. The 53rd Battalion at Alola attacked towards Missima on 27 August but its leading companies had came under sharp fire and Lt-Colonel K.H. Ward, their commanding officer, was killed. The Japanese broke through the Australian lines on 29 August and threatened the entire 2/14th Battalion position which was only saved by a counter attack. For his gallantry during the counter attack, Private Bruce Kingsbury was posthumously awarded the Victoria Cross.

The position of the 2/14th remained serious and on the morning of 30 August both the 2/14th and what was left of the 39th Battalion withdrew towards Alola. The 2/14th took heavy losses that day including its commanding officer, Lt Colonel Key, the third battalion commander killed on the Kokoda Track in just over a month. The 2/16th Battalion, which had been held in reserve, took the forward position but by 2 September the 21st Brigade had become severely depleted and the order was given to withdraw to Templeton's Crossing. By this stage, the 21st Brigade had endured nearly a week of constant fighting, during most of which time they had been unable to even brew themselves a mug of tea and had certainly received no hot meals. Shelterless, their feet pulpy and shrivelled from the constant wet, they were soaked by continuous rain. In addition to their supply problems, the evacuation of the wounded was a desperate problem with never enough carriers to move stretchers along a congested track to the road head.

The Japanese pursued the Australians who were unable to establish strong defensive positions. Just when the supply problems seemed to have been solved, Myola, with its facilities for receiving supplies, had to be abandoned. The 2/27th Battalion took up in front of Efogi on 5 September taking the automatic weapons and equipment of the 39th Battalions. The 39th Battalion was down to 185 men and moved off for Port Moresby. The Japanese probed the 2/27th position on 7 September and attacked in strength before dawn on the 8th. The frontal attack was beaten off but the Japanese worked around the flanks to threaten Brigade headquarters and to surround the rearguard unit. On the night of 8 September the survivors of the three battalions of the 21st Brigade began to extricate themselves along a side track. By 10 September, the 2/14th and 2/16th Battalion were in position in front of Ioribaiwa as a composite unit with only 307 men. In the next few days several large parties of the 2/14th, cut off in the earlier fighting and all the remained of the 2/27th, came in, weary and starving after long marches around the flanks of the advancing Japanese.

In leaving Myola, Brigadier Potts not only lost his main supply point but was also disregarding his latest orders. His decision was later vindicated but on 12 September he was replaced by Brigadier S.H. Porter and did not receive another active command until the closing months of the war. Porter in taking command of the 21st Brigade brought with him reinforcements, the 3rd Battalion and the 2/1st Pioneer Battalion and was told that the 25th Brigade would soon arrive to spearhead operations to stabilise the Owen Stanley front. The 25th Brigade had left Australia on 1 September, arrived at Port Moresby on 9 September and on 13/14 September began its deployment on the main Ioribaiwa feature to which Porter had withdrawn. On 14 September, the commander of the 25th Brigade, Brigadier K.W. Eather took command of all troops in the forward area. That day the Japanese renewed their attack using the rugged country to their advantage. The next day, the pressure continued against the whole Australian front and the Australians continued to lose men since they were unable to dislodge the Japanese from the high ground. With the Japanese feeling the whole front and flanks and with Eather concerned about committing all his units to defensive tasks and losing any freedom of movement, he requested permission to withdrew to Imita Ridge. The decision was left to Eather who withdrew his forces in stages on 17 September. Eather was then ordered to fight out the battle on Imita Ridge.


Imita Ridge

The Australians, lacking shovels, began to dig in on Imita Ridge with bayonets and helmets but were screened by offensive patrolling which harassed the Japanese. Eather had five battalions with 2600 officers and men against an estimated 5000 Japanese troops. However, the Australians now had short supply lines and it was the Japanese whose lines of communications were extended and with the increasing allied air power were now being attacked for the first time from the air. On 22 September the 2/25th Battalion began probing towards Ioribaiwa and by 28 September the Australians were in a position to launch a full attack only to find that the Japanese had abandoned their positions and much of their equipment. The factors that had operated so adversely against the Australians at the beginning of the Owen Stanley campaign; the misty, rainy, muddy, precipitous mountains, slippery tracks and thick forests with incredibly bad supply facilities and enormous medical problems were now operating even more effectively against the Japanese. By the end of September the overland threat to Port Moresby had been removed and with the defeat of the Japanese invasion at Milne Bay and the success of the American invasion at Guadacanal the threat to Port Moresby had been removed.

In early October 1942 while the 25th Brigade followed up the Japanese, further Australian and American reinforcements were reaching New Guinea. The strategy was now to eliminate the Japanese from the north coast of Papua by retaking the villages of Buna, Gona and Sanananda. The Australians were to continue attacking along the Kokoda Track towards the coast while the Americans were to attack towards Buna from the south west. While some American troops were flown to Pongani, 80 kilometres down the coast from Buna, other American troops set out along the track from Jaure to Buna undertaking the difficult task of marching across the Owen Stanley Ranges. On the Kokoda Track, the Australians contacted the Japanese rearguard forward of Templeton's crossing on 8 October but the rate of the Australian advance depended on the establishment of adequate dumps of air-dropped supplies and the ability of the men to carry supplies forward from those dumps. The Japanese were well dug astride the track forward of Templeton's crossing and it was only after heavy resistance in which 50 Australians were killed and 133 wounded that Templeton's crossing was recaptured on 16 October.

The 39th Battalion at Menari, 1942


On 20 October, Brigadier J E Lloyd of the 16th Brigade took command of the forward area and commenced attacking the Japanese rearguard beyond Templeton's crossing. The Japanese defended Eora Creek until 28 October when the 2/3rd Battalion outflanked the Japanese positions and routed the defenders. On 2 November, the leading battalion of the 25th Brigade re-entered Kokoda with its airstrip which would finally solve the ever present supply problem. On 5 November, the 2/2nd and 2/3rd Battalion of the 16th Brigade ran into strongly manned Japanese positions at Oivi and at nightfall in relatively open country faced a defensive position that was some five kilometres in extent. A Japanese counter-attack on 6 November was defeated and while the 16th Brigade maintained pressure on the Japanese at Oivi, the whole of the 25th Brigade moved round the southern flank to cut Japanese communications. On 9 November, the Japanese defence around Gorari was overcome and the Gorari-Ilimo track was cut trapping the Japanese at Oivi. Frantic efforts by the Japanese to break out on 10 November were unsuccessful and the Australian battalions tightened their grip. On 11 November, the Japanese abandoned the Oivi position and fled north and east through the bush where they were repeatedly strafed by Beaufighters. The 25th Brigade pursued the Japanese from the foothills of the Owen Stanley Ranges and on 13 November, the 2/31st Battalion crossed the wide, swift Kumusi River with the coast 60 kilometres away. By 17 November 1942 all seven Australian infantry battalions were over the river and the Owen Stanley Ranges campaign was over.

The four month campaign in the Owen Stanley Ranges to defend Port Moresby had ended in the complete defeat of the Japanese. The campaign had involved four Australian Brigades with twelve infantry battalions which lost 605 killed and 1015 wounded. No accurate records exist of casualties due to sickness but between two to three men were hospitalised through sickness for every battle casualty. The ground battle had been an exclusively Australian one since they did not link up with any American ground units until after the crossing of the Kumusi. The campaign had been won by Australians who shown physical endurance and courage of the highest order.


Gona - Buna - Sanananda

The Papuan campaign was fought in three phases. The first ended with the Japanese retreat from Milne Bay. In the second phase, the Japanese advance over the Owen Stanley Ranges to within forty miles from Port Moresby was stopped by an Australian division comprising two AIF brigades and two Militia battalions and the Japanese were then driven from the ranges. The land forces involved in the first two phases were entirely Australian. The third phase, from 20 November 1942 until 22 January 1943, saw Australian and American troops clear the Japanese beach-heads at Gona, Buna and Sanananda.

The Australians and Americans approached Gona, Buna and Sanananda from three directions. The 7th Australian Division advanced along the northern end of the Kokoda Track with one brigade pushing towards Gona and the other towards Sanananda. From the south, along two separate routes, two regiments of the US 32nd Division advanced towards Buna. The front was 11 miles long from Gona in the north to Sanananda in the centre and a three mile strip of coast on the south stretching from Buna Village on the left to Cape Endaiadere, a promontory, on the right. Because of the swampy terrain and poor land communication the struggle for the beachheads developed into three separate battles.


Gona

The 25th Australian Brigade commanded by Brigadier Eather reached the most southerly of the Japanese defences at Gona on 18 November. The Japanese had strongly fortified their positions with well prepared bunkers, trenches and firing pits. The approaches were covered with cleared fields of fire. The Australians were resupplied from the air on 21 November and were ready to attack the next day. On 22 November and again on 23 November, the 25th Brigade, which was down to about 1000 men, attacked but was halted with 204 men killed and wounded and little to show for its losses. On 24 November Gona was bombed and strafed from the air. A much better prepared attack with artillery support on the 25 November also failed but casualties were relatively light. However, by this stage the 25th Brigade was exhausted from the heavy fighting and those sick from malaria increased each day. On 28 November it was relieved by a fresh 21st Brigade under Brigadier Dougherty.

The 21st Brigade closed in on Gona and poured a furious rain of artillery and mortar shells into the Japanese defences, assisted by heavy aerial bombardment. The 2/14th, 2/16th, 2/17th Battalions and from 3 December the 39th took part in the repeated assaults and by the night of the 9 December, victory had been achieved at Gona. The Australians buried 638 Japanese dead at Gona but had suffered 750 killed and wounded in capturing the village. Fighting continued for another week to eliminate a new threat that arose on the extreme western flank where a Japanese force had been landed to harass the Australians.


Buna

The battle for Buna was double-pointed because of the two lines of approach, one along the coast and one by a corduroy road from the south that led through swamps to Buna Village, the Government Gardens and the Buna Mission. Impenetrable swamps varying in depth with the tides lay between these two approaches for more than a mile, isolating one from the other. The US 32nd Division attacked the Buna-Cape Endaiadere positions from both flanks on 19 November but were quickly pinned down by the formidable and well hidden Japanese defences. Little progress was made in succeeding days and although some troops reached the edge of Buna village on 30 November progress was not sufficient for the US Corps Commander General Eichelberger who relieved the commander of the 32nd Division and took responsibility himself for taking Buna.

The reorganised Americans again attacked on two flanks on 5 December and although they suffered heavy casualties some progress was made on the northern flank towards Buna village. Japanese counter-attacks were beaten off and so much pressure was maintained by the Americans that the Japanese abandoned the village on the night of 13 December. The Americans entered the village on 14 December and found the Japanese gone. However Buna Mission and the Government Gardens and the area south to Cape Endaiadere was still firmly in Japanese hands. By 11 December after for three weeks of action the Americans had suffered 667 killed and wounded and had evacuated 1260 sick.

The 18th Australian Brigade, commanded by Brigadier Wootten, and a squadron of the 2/6th Australian Armoured Regiment equipped with eight American M3 tanks,fast 14-ton vehicles but only lightly armoured) were brought forward to Buna to reinforce the Americans. Artillery support in the form of eight 25-pounders, three 3.7 inch howitzers and one American 105 mm gun was also available. On 18 December the Australians attacked towards Cape Endaiadere with the Americans on their left in support. At 7 am the 2/9th Battalion, supported by seven tanks, aircraft, artillery and American mortars, advanced north through the Americans, on a front of about 600 yards and with the sea on their right. Attacking with weapons blazing, against the line of close-set Japanese bunkers they pressed on, though soon many were hit by the Japanese fire. On the right one post after another was shelled or bombed into silence and the leading men reached Cape Endaiadere. However, the left company, attacking without tanks lost more than half its eighty-seven men in an advance of only about 100 yards and was pinned down. The attack did not resume until after the arrival of three tanks in the afternoon. The shells set the dry logs in some Japanese bunkers on fire and soon the enemy began to leap out and run. In half an hour sixteen Japanese bunkers had been taken. The battalion lost 171 officers and men, about half the strength of the attacking companies. Two tanks were burnt out.

The track near Oivi, between Kokoda and Wairopi


At 7 am on 20 December the 2/9th Battalion reinforced by a company of the 2/10th Battalion on the right with an American battalion on the left continued the advance. With air support and four tanks spaced among the Australian infantry they moved through the coconut plantation without great opposition and by 10 am were advancing into the bush and kunai grass clothing the marshy country beyond the plantation. The tanks bogged down and were only able to travel along the beach. The attackers came under heavy mortar and machine-gun fire. The advance ended on the general line along the Simemi Creek. On 23 December, the 2/9th Battalion again attacked to take the tongue of land between the creek and the sea, losing fifty eight men killed or wounded. In six days of hard fighting the Japanese had been cleared from east of the Simemi Creek.

The Simemi Creek was a formidable obstacle to the Australians and Americans. Tanks could not negotiate the shallows and attempts to have troops attack in the area would cost many lives. After three days of searching for a safe crossing, the 2/10th battalion found a crossing downstream and the battalion moved across on 22 December. The Japanese were bewildered that the Australians had managed to cross the creek in the area they did and abandoned the adjacent positions on 23 December. By nightfall the 2/10th held about one third of the Old Strip. The 2/10th was ordered to continue the advance along the Old Strip next day and was supported by four tanks. The attack opened at 9.30 am with the tanks spaced at intervals of fifty yards, the Australians on and astride the Old Strip and an American battalion on the left flank. Tanks and infantry advanced steadily for half an hour. Then a concealed Japanese anti-aircraft gun opened fire at short range and knocked out the four tanks in quick succession. The infantry came under heavy fire but at the end of the day some 500 to 700 yards had been gained. Little progress was made on the next two days. The companies of the 2/10th were then no stronger than platoons and the desperate Japanese frequently counter-attacked. On the evening of 29 December, the 2/10th, strengthened by a company of the 2/9th and four newly arrived tanks, attacked the area between Giropa Point and the mouth of Simemi Creek, but gained nothing. On 31 December, the 2/12th Battalion relieved the 2/9th Battalion.

While the Australians and Americans under Brigadier Wootten had been making progress on Buna's right flank the Americans under General Eichelberger had made some gains on the left flank had captured the Government gardens and had isolated Buna Mission from Giropa Point. At 8 am on 1 January 1943 two Australian battalions, the 2/10th and the 2/12th with six tanks and two American battalions continued the attack on the Japanese positions east of Giropa Point. The tanks, working with precision, rolled close to the enemy's bunkers and lashed them with fire while the infantry rushed forward and hurled charges of ammonal through the loopholes. The strong-posts when overcome were found to contain from ten to seventy bodies. At the end of the long day, few Japanese posts east of Giropa Point held out. These remaining posts were reduced on 2 January, the same day the Americans captured Buna Mission. In the final drive, the 2/12th casualties were 12 officers and 179 men out of a total strength of 615.

There were 1400 Japanese buried at Buna, 500 in the American area west of Giropa Point and 900 east of Giropa Point. The US 32nd Division sustained 1,954 casualties; 466 killed and 1508 wounded. In sixteen days the 18th Brigade had lost 55 officers and 808 men, including 22 officers and 284 others killed.


Sanananda

The 16th Brigade, under Brigadier Lloyd approached Sanananda which was the main Japanese base. It was later estimated that 5300 Japanese were deployed in front of Sanananda at the commencement of the coastal fighting. On 20 November, the Australian advance came under heavy artillery fire, lost heavily and was stopped. The following day the Japanese counter attacked but the Australians, although skilful and resolute in holding their positions, were unable to advance themselves. The strength of the 16th Brigade was now down to 67 officers and 974 men having suffered battle casualties of 25 officers and 536 men since starting across the Owen Stanley Ranges.

The Australians were reinforced by the 126th Regiment of the US 32nd Division which attempted to push forward on 23 November without success. By the end of the month the Sanananda situation was a stalemate. The Americans established what was known as the Huggins Road Block and in the first few days of December held the position against continuing Japanese attacks. On 6 December two militia battalions of the 30th Brigade commanded by Brigadier Porter relieved the 16th Brigade. A third attempt to push forward was made by the 49th and 53rd/55th battalions on 7 December but the attacks were repulsed with heavy losses. There was to be a lull on the Sanananda front for twelve days since it was decided to strike at Gona and Buna first before attempting to reduce the Sanananda positions.

The Japanese received some reinforcements during the battle and by mid December the Japanese force at Sanananda numbered 6,000 men including sick and wounded. On 15 December it was estimated that they were opposed by 646 Australian and 545 American infantry. Two fresh units, the 2/7th Cavalry Regiment serving as infantry and the 36th Battalion, were brought forward from Port Moresby.

At 7.22 am on 19 December the guns opened fire on the Japanese positions with the mortars joining in four minutes later. At 7.30 am the 49th and 55/53rd battalion went forward with the 36th battalion in reserve. The 49th made good progress and Brigadier Porter promptly reinforced it with a company of the 36th. At the end of the day the 49th was a few hundred yards south-east of the Huggins road-block. The 55th/53rd met strong opposition and made little progress and on 21 December the 36th Battalion attacked but lost fifty five killed and wounded and gained little ground. The 2/7th Cavalry reached the Huggins road-block on 18 December having used a supply route flanking the Japanese positions. At 6 am the next day the 2/7th Cavalry moved north towards Sanananda Point. The regiment came under heavy fire and the commanding officer, Lt-Col E P Logan was killed. A squadron with about 100 cavalrymen became separated from the rest of the unit and at nightfall set-up a perimeter about 400 yards forward of Huggins. They remained cut-off for several days until a route was found between Huggins and the isolated men. On the 23 December the main body of the 2/7th Cavalry moved out of Huggins and concentrated in the perimeter 400 yards forward of Huggins. There was still well entrenched Japanese between the 2/7th Cavalry and Huggins and between Huggins and the 30th Brigade.

The 163rd Regiment of the US 41st Division began arriving at the Sanananda front on 30 December. On 5 January 1943 the 18th Brigade moved in from Buna. The Americans took over Huggins and the 2/7th Cavalry perimeter which they name Kano and on 7 January established a third road-block on the Killerton track called Rankin. The 18th Brigade with the 2/7th Cavalry replaced the 30th Brigade south of Huggins. At 8 am on 12 January the 18th Brigade with the support of three tanks launched its attack. The tanks were quickly knocked out by anti-tank fire but the infantry fought on doggedly, killing a great many Japanese and reducing a number of enemy positions. However, the 2/12th Battalion had scarcely advanced by the end of the day and had lost 4 officers and 95 men. The Australians were bitterly disappointed at the apparent failure of the day but had misread the situation. Although there were still plenty of unreduced bunkers standing, the Japanese had had enough and on 13 January began withdrawing from the positions in front of the Australians.

Lieutenant-General Adachi, commander of the Japanese 18th Army in New Guinea, hands his sword to Major-General H.C.H. Robertson of the 6th Division after signing the surrender documents at the Cape Wom airstrip


The 2/10th Battalion quickly advanced through bush and swamp to Cape Killerton, meeting only isolated Japanese parties. The 2/12th Battalion reached the track behind the Japanese on 17 January and the next day took Sanananda Village. On 19 January a company of the 2/10th Battalion broke into a strong Japanese base, killing about 150 and nearly encircling the remainder. The Japanese continued to resist and on the 21st the Australians closed in and killed the 100 remaining defenders who refused to yield. In the week from 13 to 20 January 1943, the Japanese evacuated about 1,200 sick and wounded and another 1,000 escaped overland. Although there were still many resolute Japanese moving about, organised resistance in the Sanananda area had been broken by 22 January. Australians and American casualties in the Sanananda area totalled 2100 including 600 Australian and 274 American dead.

The fall of Sanananda marked the end of the Papuan campaign. Of the 20,000 Japanese landed in Papua between July 1942 and January 1943, about 7000 were evacuated by sea or escaped overland. Nearly 13,000 Japanese were killed or died of illness in the Papuan operations. In operations in Papua 2,165 Australians and 671 Americans were killed and 3,533 Australians and 2,172 Americans wounded.


The National Heroes of Australia

Australian Nationalism Information Database - www.ausnatinfo.angelfire.com